
by Silver RavenWolf
copyright 2018
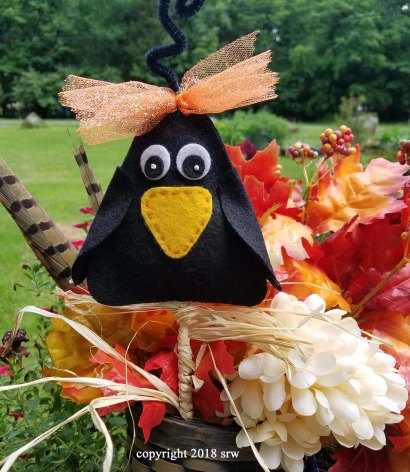
Baby Crow can be made easily from felt in a very short time, making this project a super fun activity for children! I structured a simple, versatile design so that you can create baby crows for quilting applique, primitive cloth (add ¼ inch seam allowance) stuffed animal/ornie, felt, or paper crafts. The Baby Crow (Marmalade she calls herself) shown in these instructions was created out of felt.
Supplies for Felt Project–
Black Felt
Yellow Felt
White Felt
Black Pipe Cleaner (optional)
Wooden Skewer (found in the grocery store)
Raffia (optional)
Orange Perle Embroidery Thread (optional)
Polyester or Natural Cotton stuffing (you can even use cotton balls)
Embellishments (you choose – optional)
Tools for Felt Project-
Scissors
Glue Gun
Tweezers or Clamps (optional)
Magickal Formula
Rosemary Herb
Lemongrass Herb
Ginkgo Biloba
Gotu Kola
Peppermint
Ashwagandha
3 Pumpkin Seeds
3 copper pieces or pennies
 Step One: Re-size pattern to your liking. You may like to have a BIG baby crow, or a little one. You choose! Cut out pattern from paper. Place pieces on felt and cut out all parts of the bird. The pattern tell you how many you will need of each piece.

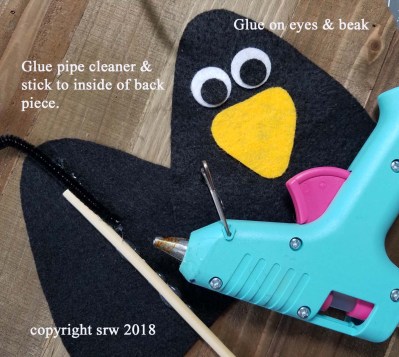
Step Two: Glue eyes and beak onto front bird body. Glue stick (if you will be using one) and pipe cleaner to inside of second piece. Gluing these items now saves hassle later.
Step Three: Gather the magickal supplies you will use to include in the body of the bird. You may wish to add a special crystal, a lock of your hair, or dirt from a prosperous place that supports your creative gifts. The formula given here is only a suggestion — you may wish to choose a different blend entirely. For example, your baby bird can represent good fortune, healing… whatever you desire. I also stitched around the beak with orange thread to give the bird a bit more personality.

The formula shown here was specifically designed for calling in the powers of your muse!
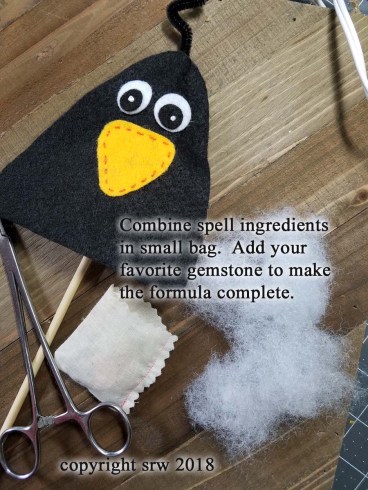
Step Four — I gathered together all my magickal ingredients and placed them in a small muslin pouch. I also added a paper sigil for awakening the muse within, or you may simply like to write a blessing on a small piece of paper and insert your heartfelt words into the baby crow.
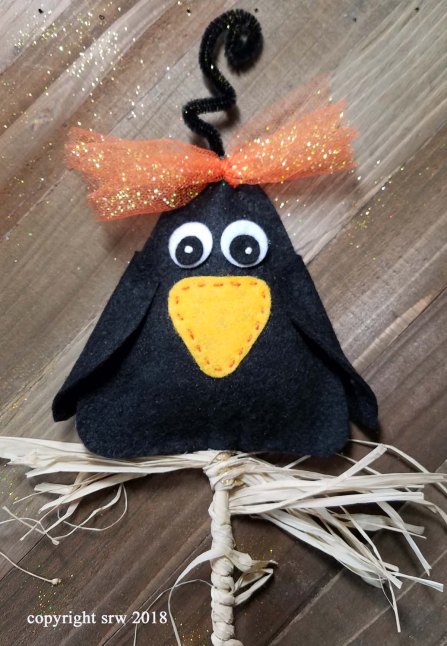
Step Five — Begin gluing the front to the back of the bird, about an inch at a time, adding the poly stuffing in small bits as you go. The intent is to have enough padding under the face of the bird so that the stick doesn’t show and give the bird a bit of a dimensional feel. Once the bird has cooled, simply fold the wings and affix with glue to either side. If you want the wings to stick out a bit, just glue the top portion of the wings to the body, wrapping the wings from back to front.

Step Six: Finish the bird by adding your own unique embellishments! If you don’t want to use the stick for display purposes, you can glue or stitch dangling legs made of beads, or black cord with small blocks tied to the bottom for feet. Use your imagination to make the coolest Baby Crow ever!
Thank you so much for visiting my blog today! I hope you enjoy making Baby Crow. Be sure to visit my shop https://www.whispermagick.com for a great selection on soy candles. You can also fine me on FaceBook, Instagram, and Twitter!

